


Your Magnetic Resonance Angiography
 Download PDF
Download PDF
Your Magnetic Resonance Angiography
We want to ensure that you receive the highest level of healthcare. This means keeping you educated and informed about what is involved in the different stages of your Magnetic Resonance Angiography. If you have any questions or concerns, please speak with your specialist or medical team.
Understanding Magnetic Resonance Angiography
Magnetic Resonance Angiography (MRA) is a type of Magnetic Resonance Imaging (MRI) Scan that uses strong magnetic fields and radio waves to create detailed images of your blood vessels. It helps doctors identify narrowing, blockages, aneurysms, or other abnormalities without the need for invasive surgery.
It is often used to:
- Examine arteries in the brain, neck, chest, abdomen, and legs
- Detect aneurysms or vascular malformations
- Evaluate narrowing or blockages caused by
atherosclerosis - Assess blood flow after surgery or stent placement.
Why It Is Done
An MRA provides clear, detailed images of your blood vessels without exposure to ionising radiation. In some cases, contrast dye (gadolinium) is used to enhance the images.
Common reasons include:
- Investigating stroke or transient ischaemic attack (TIA)
- Assessing suspected aneurysm or vascular malformation
- Detecting narrowing or blockages in arteries
- Monitoring known vascular disease.
Preparing for Your Procedure
What to Tell Your Doctor
Let your care team know if you:
- Have a pacemaker, metal implants, or surgical clips
- Have had previous allergic reactions to MRI contrast dye
- Have kidney problems (as contrast dye may not be suitable)
- Are pregnant or may be pregnant
- Experience claustrophobia or anxiety in enclosed spaces.
Pre-Procedural Instructions
Your team will give you detailed instructions, which may include:
Not always required. If contrast is used, you may need to avoid eating for 2–4 hours.
Most medications can be continued, but check with your doctor.
Remove jewellery, piercings, watches, or clothing with metal fastenings
You will sign a consent form, especially if contrast dye is used.
If you are anxious, mild sedation may be offered; arrange transport home if this is the case.
Packing for the Hospital
Bring the following on the day of your procedure:
- A list of current medications and allergies
- Photo ID
- Comfortable clothing without metal zips or fasteners
- Any required hospital paperwork.
Leave valuables at home.
The Day of Your Procedure
On Arrival
- Check in at the admissions desk.
- A staff member will confirm your details and review your safety questionnaire.
Before the Procedure
- You will change into a hospital gown if required.
- An intravenous (IV) line will be placed if contrast dye is needed.
- The radiographer will explain the process and answer any last questions.
What to Expect During the Procedure
Step-by-Step Overview
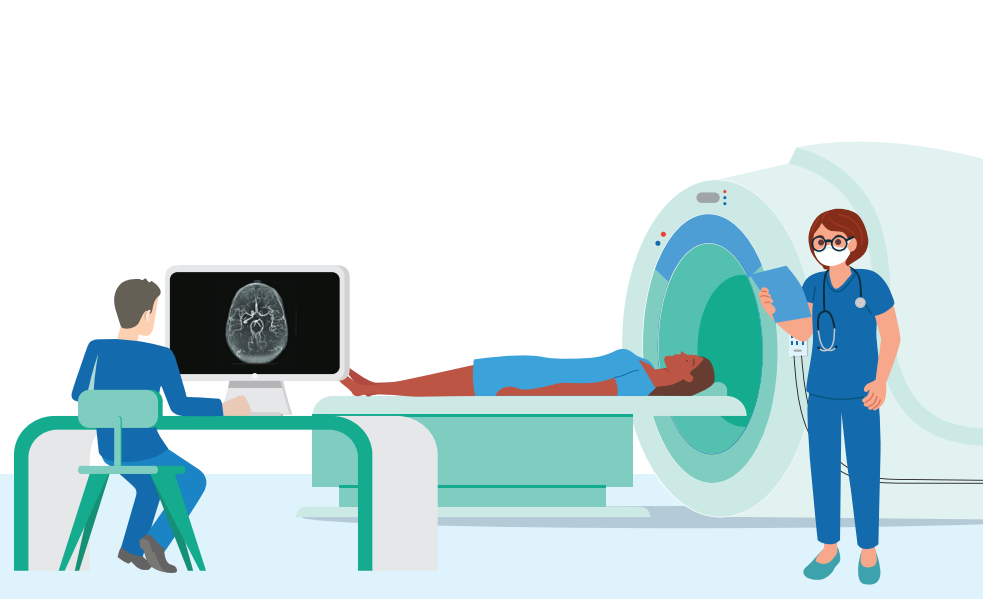
STEP 1: Positioning
- You will lie on a motorised table that slides into the MRI scanner
STEP 2: Scanning
- The scanner uses magnetic fields and radio waves to take images.
- Loud tapping or knocking sounds will be heard; you will be given earplugs or headphones.
- You will need to remain very still. At times, you may be asked to hold your breath for a few seconds.
STEP 3: Contrast Injection (if needed)
A contrast dye will be injected through your IV line to enhance blood vessel images.
STEP 4: Completion
- The Scan typically takes 30–60 minutes.
- Once complete, the IV line is removed, and you may get dressed.
Recovery After the Procedure
In the Hospital
- You can usually go home immediately after the Scan.
- If contrast dye was used, you may be asked to drink plenty of fluids to help flush it out.
- If you received sedation, you will need someone to accompany you home.
Caring for Yourself at Home
Resume normal activities unless told
otherwise.
Resume normal activities unless told otherwise.
Drink extra fluids to help clear the dye from your system.
Rest and avoid driving, operating machinery, or signing important documents.
When to Seek Medical Attention
Contact your care team or go to the Emergency Room if you experience:
- Severe allergic reaction (rash, swelling, difficulty breathing) after contrast injection
- Persistent pain or swelling at the IV site
- Dizziness, chest pain, or unusual symptoms following the Scan.
Follow-Up Appointments
- Your doctor will review the Scan results and discuss them with you.
- Follow-up may include further imaging, specialist referral, or treatment.
- Results are typically available within 1–2 weeks.
Frequently Asked Questions
Other Patient Pathway Posts
Pulmonary Embolism

What to Expect After a Head Injury

Recovering After A Concussion

How to Care for a Child Who Has Croup

Choking: What You Can Do to Help

Understanding Your Headache & When to Seek Help
Understanding Burns
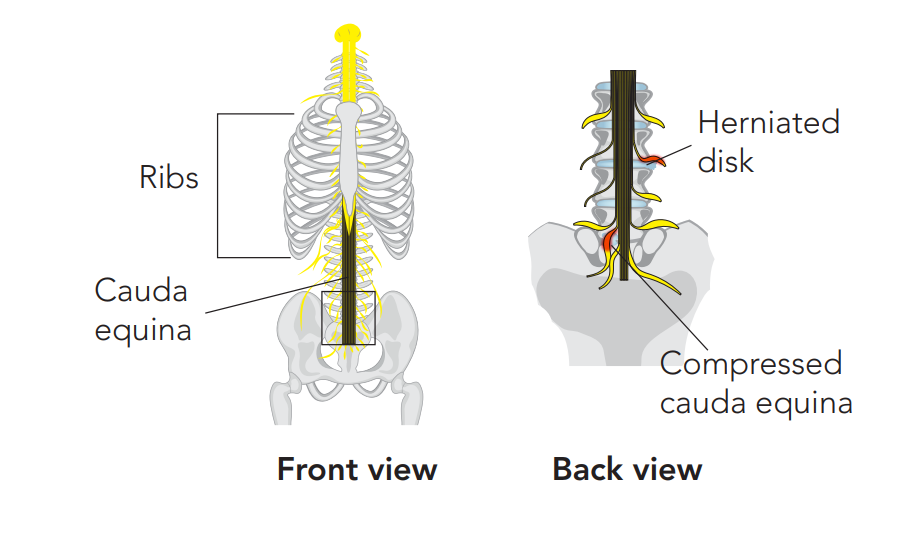
Recognising the Red Flags of Cauda Equina Syndrome
Recovering After Cauda Equina Syndrome
Recovery From Back Pain


